Friday, December 12, 2014

Pre and Post Expo

Well hello everyone!

Ethan here, and we finally made it through the final day of the crossbow project, at least as far as our grade is concerned.

It was nail-bitingly close, as several things seemed to go wrong all at once, and everything needed to be addressed.

Starting off, we had to order a new motor for the crossbow, which didn't arrive until Wednesday, the 10th. And low and behold, it didn't fit the snazzy new gears we had acquired from an old Engineering teacher of mine who I shall keep anonymous for privacy reasons. The gears, as well as the housing that I built for them, are comprised of parts from a company called VEX, and they not only held up much better than the previous gears, but provided a more solid foundation for the gearbox itself, as well as making it easier to position and mount.

This left the body to be made, so Tuesday night, I grabbed a bunch of cardboard, some duct tape, and made the first body the prototype would be shown in:

 Scruffy here was kind enough to model the ADC V1.0 (Automatically Drawn Crossbow), and as you can see, its not the prettiest frame, but it was what I had lying around.

 Just a side profile here
And a top view to finish it off.

Alas, the cardboard frame brought its own problems. While it held everything, it was not very sturdy. Drawing the bow would cause the cardboard to deform slightly, which resulted in a loss of energy in attempting to draw the crossbow. A few inches was better than an immediate stall, but this still would not do. Luckily, Scruffy remembered he had some wood lying around at his house, and took the bow home to construct a more sturdy body.

Meanwhile, the motor was having its own issues with the design. The housing we had purchased for the motor did not line up with the holes in the VEX plates, so there was no way to mount it. Whats more, the motor shaft was 3mm in diameter, just small enough to not gain any purchase on an 1/8" square hole. So a mounting plate and a coupler had to be designed and 3D printed before the expo on Friday.

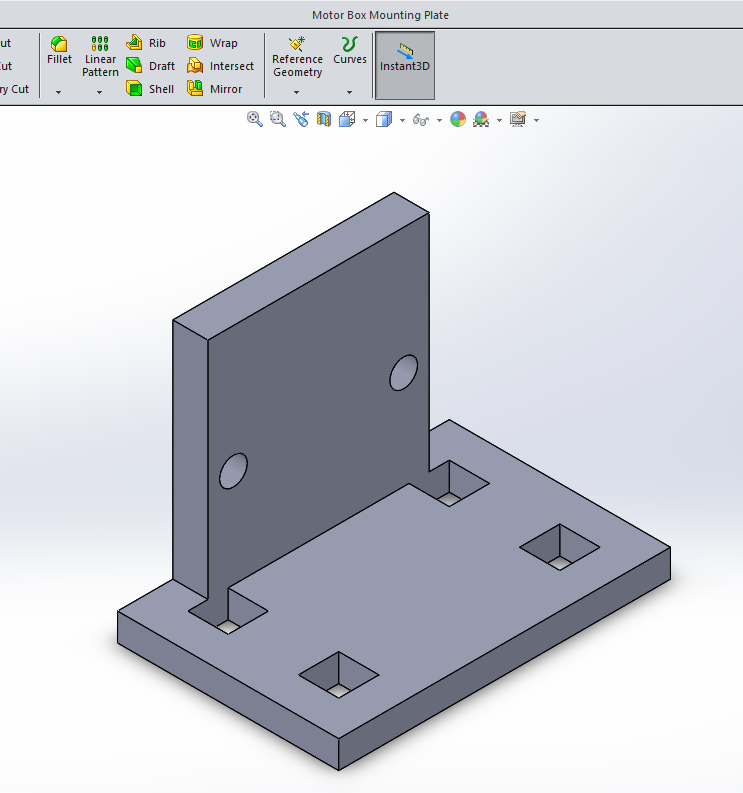
Mounting Plate in Solidworks
The motor shaft side of the coupler in Solidworks
The axle side of the coupler in Solidworks

Thankfully the parts were able to get fabricated and were picked up at around 1PM on Friday, the 12th, just one and a half hours from the expo.

Now not only had Scruffy been able to make a simple wooden base for the crossbow, but he also used a double pulley I still had lying around along with one of his own, making a pulley system to increase the advantage of the gearbox and make it even easier to draw the bow. It was only able to draw between 6-8 inches before we were uncomfortable with letting it run, but that's still a sizable amount.

 Now you might notice the hammer lying on the table here. That's not just randomly there. Our firing mechanism was made up of a metal pin going through the crossbow, and that hammer. The hammer was hooked onto the pin portion under the crossbow and levered to pull the pin through until the string released. This firing system turned heads, but had them quickly looking the other way to watch the cardboard tube soar across the expo room.

We are proud that we were able to get this up and running, but it doesn't stop here. A better motor, better gears, a custom gearbox, a more optimized frame, and we could have something quite feasible here. But for now, our professor liked it, onlookers liked it, and it was a blast to shoot around and show off the mechanics. Prototype successful as we see it.

So until more work gets done on this, I bid you all adieu,

Ethan Weigold

Saturday, December 6, 2014

Update on progress

Howdy. Scruffy here.

The last few weeks have been busy here for the members of Project ADC. We did some planning, coding, rapid prototyping, and attended the dean's prototyping showcase.

In order to make a motor draw the crossbow, a code had to be written. The code activates the stepper motor at the press of button 1. Then motor continues to draw until another input is given. If button 1 is pressed again, this acts as a kill switch. The motor stops drawing, but retains holding torque just in case something were to go wrong. Another press of button 1 releases the holding torque. Hitting the button one last time restarts the cycle. If button 2 is pressed this also stops the motor. This button will be placed at the fully drawn position of the crossbow, that way it is activated when the string contacts it.


For the rapid prototype, gears were laser cut out of  lexan, and a rudementary gearbox was created out of cardboard, using the key stock for the axles. The final gear is on an axle that also houses a spool. As of now, a stock to mount everything to has not been manufactured, but we do have a functioning bow arm with the appropriate draw strength. This process deserves its own post, and shall be visited at a later time. 


This is just a video of everything we have working together, for the most part.

I will conclude by stating that we learned a lot from attending the showcase. We learned that our current motor isn't quite up to the task, perhaps due to power or coding issues, but more likely because it isn't strong enough. This is being addressed, and hopefully everything will come together within the next week. 

-Scruffy Out.

Monday, November 24, 2014

Pictures of failed bow limbs


These were limbs that i hand crafted but unfortunately due to the nature of bending PVC sometimes the results are the  most desired; however, the process itself is relatively easy, cheap, and replicated easily. 


Saturday, November 22, 2014

-Draft- Construction videos of the bow limbs

So these are some recordings of me making the bow limbs these are the -draft- videos ill have a playlist of the better version up very soon. Below is a link to my Youtube channel where i posted the current videos up. Once again i will have more coming.

https://www.youtube.com/channel/UCdukhaSDsRoJ4Do8Rq76lkQ/videos

Tuesday, November 11, 2014

Getting Supplies and Testing Materials

Hey all, Ethan here.

Our group has put in a request for a number of items that should be useful or necessairy for the crossbow, or rather entirely useful, if not fully utilized all at once.

Spring Steel Standard Key Stock, 1/8" x 1/8", 12" Length
Impact-Resistant Polycarbonate Sheet, 1/4" Thick, 12" x 12", Clear
Motor Shield v2.3
8 x AA battery holder
Micro Switch w/ Roller Lever - Three Terminal
Stepper motor - NEMA-17 size - 200 steps/rev, 12V 350mA
Micro Servo - High Torque Metal Gear
DC Barrel Jack Adapter - Breadboard Compatible
DC Barrel Jack Plug - Male

 Hopefully out request clears and we are able to get covered for all the above under the Dean's Challenge, let alone get cleared on the request.

The Polycarbonate is for constructing gears out of for the gearbox that the stepper motor with drive, and the servo is to be able to push the motor into place and take it out before firing. The key stock will be for the gear axles, with the hope that they will better withstand any torque that is acted upon them.

The motor shield is to run the servo and stepper motor, and the battery pack will be for powering the motors directly rather than through the Arduino.

The DC parts are for if we are to get a 12V rechargeable battery pack, which would allow us to recharge the battery within the crossbow rather than having to open up and remove it.

With the remaining funds, we still have some wiggle room, which is good, considering we still plan on getting the following items:

Scheduled 30 PVC Pipe (Diameter varying)
1/8 in Nylon Cord
Fiberglass Stakes

We do have access to some of these already, but at least we know we have funds if we ever need more.

The PVC and Fiberglass Stakes are for the crossbow arms, and the cord will be for the drawstring.

Brendan got to making a mock up of what he envisions the crossbow will look like once made to full scale:


We will be testing the PVC to find the optimal draw length, so 2 ft. may be a bit much, but we won't know until we do tests.

That's all for now. Hope to post more soon.

Regards,

Ethan

Monday, November 3, 2014

Schedulin'

For the sake of keeping our group up to date on each other and where we might be in the hours of the day, we have decided to post our school schedules.

 Brendan Lam:

Brett Reed:

Ethan Weigold:

Project ADC: The Introduction

Hello there!

We are Project ADC, a group with the goal of making a LARP (That's Live Action Role Play) crossbow, capable of having a draw strength of 25-30 lbs, as well as being automatically drawn by an Arduino run gear system, with the possibility of a variable draw strength system do dial in draw strengths between twenty and thirty lbs.

Arduino will hopefully be able to bring this project to life, as it has for countless others, like these:

Real Tracking and Shooting Portal Turret:


Gauss Rifle (6 Stage Coilgun):


Arduino GPS Board:


 We hope to post more about this project as we go, but like, not cause its for a grade or anything. Clearly we just love to share our information with the world; Our totally not graded or dependent on passing the class information.

Regards,

E. Weigold

    *From Left to Right: Brendan Lam, Brett Reed (AKA Skruffy), Ethan Weigold

 If you ever feel like contacting one of us, be it for more info, to make suggestions for the project, or just to hear our sultry voices and be astounded by our stunning visages in person, just refer to this wonderful info below:

Brendan Lam:
Email (School): Brendan_Lam@student.uml.edu

Brett Reed AKA Skruffy:
Email (School): Brett_Reed@student.uml.edu

Ethan Weigold:
Email (School): Ethan_Weigold@student.uml.edu